
Montessori Sandpaper Letters DIY
- Marisa Delhay

- Nov 13, 2022
- 3 min read
Sandpaper letters are a traditional Montessori material and can be found in any primary (age 3-6) classroom. Their function is to teach proper letter formation separate from learning proper pencil grasp. Within the framework of the Montessori method, skills are taught in isolation. This is called isolating the difficulty. In this way, a learner doesn't get hung up on one aspect of a task and get held back from practicing and mastering the part they are ready to learn. Skills such as writing have many components: letter identification, letter formation, pencil grasp, pencil pressure, etc. All of these skills eventually come together, but separating them allows the child to avoid frustration and work on each skill individually.
Another important thing to note about the literacy curriculum in this method is that we begin first with isolating and identifying letter sounds in a natural linguistic progression from learning to communicate verbally to learning that these words which we say aloud are made up of individual sounds which can be broken apart. Many know this as phonological awareness.
Once the child is aware of sounds within the words we speak, we introduce the idea that there are symbols which represent these sounds. They are called letters! In the mainstream preschool classroom, you will often find that uppercase letters are introduced first, but in the Montessori classroom you will see lowercase letters being introduced first. The rationale here is that when reading and writing, we encounter lowercase letters far more frequently, so learning them first is more efficient.
Eventually, of course, the uppercase alphabet is introduced and connected to the lowercase alphabet...and THIS is how my DIY came about. Prior to this project, I'd purchased the lowercase sandpaper letters from a catalog and we had been happily working with them in our in- home classroom. We reached the point where my (then) 3 year old had mastered the lowercase letters and was ready to move on to the uppercase alphabet. So, I decided this time I'd try to make them myself!
MATERIALS:
The first step was a trip to Home Depot for a large, thin sheet of plywood, a sample size of Savannah Rose paint, a sample size of Bright Bay Blue paint, and a can of spray shellac. I already had Mod Podge, paint brushes, die-cut letters, and a small bag of craft sand.


We happen to have a table saw at our house. I know not everyone does. So, if you do not have access to a table saw this may not be the DIY for you in terms of cost effectiveness. Don't go out and buy a table saw just for this project! My husband cut the plywood into 26 5X7 pieces...because he is awesome and I don't like using power tools.
HOW TO:

I painted 21 of the boards pink (for the consonants) and 5 of them blue (for the vowels).

Once the paint dried, I traced a letter onto each board very lightly so the pencil marks wouldn't really show after I added the sand.
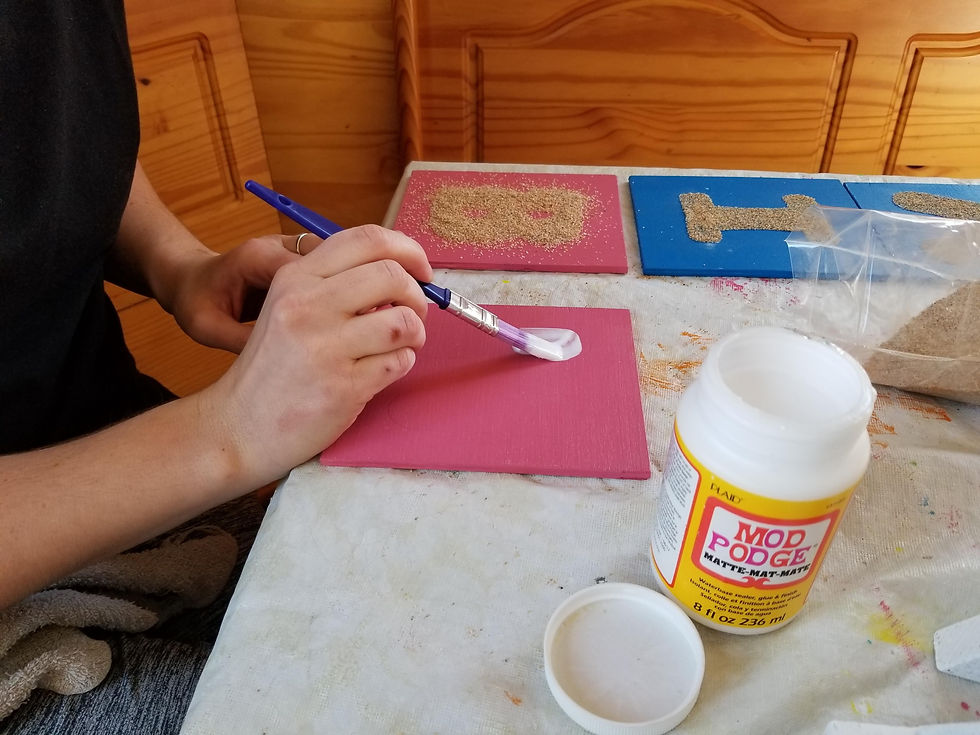
Next, I Mod Podged inside each letter and sprinkled with craft sand. I let each dry for about a minute and then poured off the excess sand.

Once the Mod Podge was dry, I added a coat of shellac to keep the sand from flaking off. Once dry (it only takes about 5 minutes) I added a final coat. And that's it!

Our uppercase sandpaper letters! Altogether (not including drying times) it took me about 3 hours and cost me about $30, but with the leftover sand, paint, shellac, and Mod Podge you could make 2 additional sets of both upper and lowercase letters, a set of numbers, and STILL have leftover materials. So, assuming you have a table saw I absolutely recommend trying out this project. The kids were all excited to watch me make something for the classroom, so there is also the added benefit of having your children see you create something from scratch. Every moment is a lesson!


Comments